Wednesday, May 27, 2009

Projects and planting

So I know that there was a huge gap in time between today and the last post, so sorry.
We have been getting the farm into running condition, tidying up, training interns, finishing projects and of course, planting like crazy!

Quick update: the raised beds at ground level are finished, the cold frames have come down and the trellising is going up, we have 5 kinds of tomatoes planted in the boxes, along with arugula, eggplant, 4 different varieties of peas, a few different lettuce mixes, and a lot of herbs. We purchased black, red and white currant bushes which now live in our front ground level beds. And we have Concord seedless grapes and Catawba grapes, which will help construct the arbor that we are building over the front entry way! We have two kinds of fava beans planted in Earthboxes and next week will hopefully warm up enough to plant some corn and more beans.

Beehive Building

Last week we received our new bees, four hives worth!

Over the winter one of our two old hives didn't make it, we think they lost their queen too late in the season. That hive died before the worst of winter even arrived, leaving us with one hive from last year. The remaining hive was holding strong through March, when we had a huge spike in the temperature (60 degrees) and then it dropped back down into the low 30's, within a day. We have assumed that this caused them to leave the hive prematurely, and they were unable to gather quick enough to regain the heat they needed to stay alive. So, sadly, they went too. We discovered that both hives had perished in April, when the temperatures started to rise again and we saw no bees out and about. So, we set about ordering new bees.

Our new bees come from Russia, although we purchased them from a gentleman in Ohio. I have a firm belief that if they can survive Siberia, they might make it through a Chicago winter. (We're sort of Siberia, right?) The bees arrived in quaint wood boxes with mesh sides and a smaller interior queen box held in the center. The queen remains in her individual box, to keep the other bees concerned and surrounded, therefore keeping them from leaving the mesh box - a very good thing. Our bees arrived in 4 separate boxes, 2 of which were missing their queens. Not good. So, we set up two of the hives with lots of extra bees and then ordered a few more queens. Once those queens arrived we were able to separate some of the bees and put them into the new hives. Because they started with the other hives and therefore the other queens, we had to move the 2 new queen hives far away from the others. Helen took them home to let them settle in and adapt to their new queens. Whew, what an ordeal, but we now have 4 hives, 2 from last year and 2 new ones, all with bees and queens.

The hive bodies, supers (the part that holds the frames) and the frames (the part that holds the honey harvest) were built by an amazing team of volunteers. The day we had planned to build everything on was super rainy and gross, so we had to build inside. Hammers, wood, nails; not a great combo indoors. It was loud, but they endured and 3 hours later we had a host of supers and a summers supply of frames. They are truly amazing and I love getting to know all the new faces each volunteer workday that comes around.

Enjoy the photos, let me know there are any questions about the beehives!

Friday, May 1, 2009

Reminiscing in the rain

Chicago has gotten a lot of rain in the last few weeks. In fact, I don't think I've seen the sun since the last post. Err. It's both a blessing and a pain. On one hand our seeds that we planted are super happy, truly bringing to life the phrase "april showers bring may flowers", or, um, vegetables. But, its also difficult to plant when it just wants to be soggy all the time. It's been a mad dash to sneak seeds into the ground in between storms, but we have 3 types of peas that are now sprouting and a lot of arugula that is thrilled with the downpours. We also recently planted several varieties of carrots, radishes, beets and mesclun mix lettuces. Since it's ceased to rain for the morning I'll be checking them all out and scrutinizing thier growth later today.

In the mean time, while we are awaiting spring veggies, I thought I'd go back and tell you all about the cold frame building workdays that we had in late March. I never got the chance to show fully what we did and how it is turning out.

On March 25 and 26 we had a group of volunteers that showed up in the cold to help us build out 2 coldframe/low tunnels over a few of our raised beds on the roof. The tunnels turned out to be really easy to construct and we had way more than enough hands to do so.

We started with the following supplies:
3mm thick plastic sheeting
1/2" conduit piping, in 10' lengths (this acts as the spine at the top of the coldframe)
1/2" conduit piping, in 2' lengths
90degree conduit connectors
1/2" rebar stakes, 18" in length
1/2" PVC piping, in 8' lengths
2"x1" wood slats, in 5' lengths
Zipties

Because we built these coldframes on top of raised beds they didn't need any sort of intense anchoring, the wood frame of the boxes was enough. If you build these on the ground then they need a more intense frame/anchor system that will make sure they stay in place.

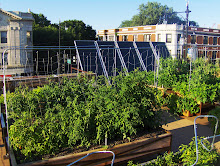
The first step was building the conduit pipe spine, which anchored into the boxes in the same location that the trellis system would be. Then we tapped in the rebar, directly against the wood boxes, down into the soil a full 12". The PVC pipes got bent over the center conduit piece and then connected with the rebar, which goes inside the PVC pipes 6" deep. The PVC pipes were then ziptied to the center conduit piece, to keep everything in place, even in Chicago winds. The plastic was cut to fit the boxes and then laid over the pipe system. At each end the plastic was ziptied to the PVC pipes, to ensure that it stays put for the season. We used the staple gun to attach the wood 2"x1"'s to the bottom of the plastic sheeting on the long sides of the beds, this acts to keep the plastic walls weighted down. To make it easy to access we used plastic clips on each corner to hold the plastic in place. These can be easily taken off and the plastic walls lifted up to plant, water and check on the veggies! The photos will explain some of the details, and if you have questions about it just let me know!